
|
|
|||||||||||||||||||||||||||||||||||||||||
BASIC INSTRUCTIONS
FOR HOME BREWING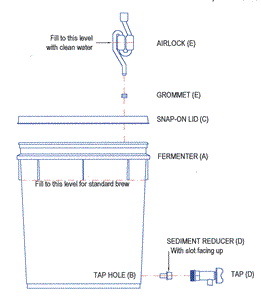 Cleaning & Sterilising
the Fermenter and Equipment Cleaning & Sterilising
the Fermenter and Equipment* The Fermenter (A) - With the bung fitted to the tap hole (B) of the fermenter, add a solution of 2 teaspoons of Pink Stain Removerwashing & sterilising powder to 2 litres of hot water; attach the lid (C) and roll so that all internal surfaces of the fermenter are thoroughly covered by the Pink Stain Remover solution. Finally, allowing the solution to run out through the tap hole, rinse thoroughly. * Other Items - Using a jug or the fermenter, immerse the tap & sediment reducer (D), the airlock & grommet (E) and the plastic spoon in a solution of 1 teaspoon of Pink Stain Remover washing & sterilising powder to 1 litre of hot water. Again, rinse thoroughly. Assembling the Fermenter * Fit the sediment reducer into the rear of the tap, with the slot facing up. * Screw the tap securely into the tap hole of the fermenter. * Fit the grommet into the lid of fermenter and insert the airlock. * Peel the backing from the thermometer and fix the thermometer to the centre outer face of the fermenter. Making up the Brew * Remove the plastic cap and label (providing it's a paper label) from the can of beer concentrate and put the packet of yeast aside. Stand the can in hot water for 5 to 10 minutes to soften the contents. * If finishing hops are to be used, prepare the finishing hops (12 grams of hop pellets contained in a "tea-bag"), by steeping in a cup of boiling water for approximately 10 minutes while preparing the rest of the brew. * Empty the contents of the can together with the required brewing sugar/powdered malt/malt extract etc, into the fermenter, rinse out the can several times with hot water and add the contents to the fermenter (take care to use a tea towel or such when picking up the hot can). Please note: It is important that you don't add too much hot water while topping up to the 22 litre mark. * Using the plastic spoon, thoroughly dissolve the contents of the fermenter. * Top up the contents of the fermenter to 22 litres by adding hot or cold water so that the final temperature is ideally between 21 and 28 degrees, and then stir thoroughly. * If using a clearing agent (finings), dissolve the finings in a cup of hot water and add to the brew in the fermenter. * Pour in the contents of steeped hops, prepared earlier, including the "tea bag", then stir. * If the ideal temperature cannot be achieved but if the temperature is between 18 and 32 degrees, open the packet of yeast and sprinkle the contents over the surface of the brew in the fermenter. * Attach the lid & airlock to the fermenter and half fill the airlock with clean water. |
|
| Fermentation * Fermentation will begin within 12 to 24 hours after the yeast is added and will usually be complete within 6 to 12 days, depending upon the temperature at which the brew is maintained. Note that fermentation can take longer, especially in winter. * It is important to maintain a constant brewing temperature. * If the brew gets below 16 degrees and ale yeast has been used, some form of heating will be required. In the form of a heating belt or a brewing heating pad. * The optimum temperature for ale yeasts is 18 to 24 degrees. Quality lager yeasts tolerate temperatures down to as low as 10 degrees, which is great for winter brewing of nice crisp lagers and pilsners. |
|
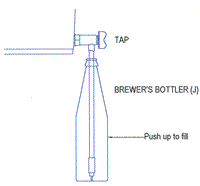
Bottling |
|
© Asquith
Home Brewing 3/46 Edgeworth David Avenue, Waitara NSW 2077 Australia Telephone & Facsimile: 612 9476 2022 Email: info@asquithhomebrewing.com.au |